Signsecure Digital Signature Software : Digitally Sign PDF's In Bulk
-1.png&w=3840&q=100)
How to Digitally Sign PDF In Bulk with Digital Signature Software
Hi Friends! As we know, in corporate offices, authorized signatories often sign many documents manually with company stamps. We also store all the important signed documents for years. It's well-known that it is very time-consuming and a significant task to physically store and organize these documents. That’s why we're transitioning to paperless systems by securely storing documents online. However, manually signing and scanning documents to save online is still a big task.
Here comes the solution: Signsecure Digital Signer Software (Windows-based), Signsecure Digital Signature API, Signsecure Digital Signer Library , and Signsecure Web-Based Digital Signer (Browser Extension) to solve your problem. Our software can easily integrate with your existing software, ERP, CRM, or websites. Contact us for more information.
In this blog, we will learn how to sign bulk PDFs with Signsecure Digital Signer Software (Windows-based). No need to manually sign any document anymore. Our software can sign unlimited PDF documents with multiple digital signatures, and you can easily share or save the signed PDFs anytime.
Requirement :-
1) A valid Class 3 Digital Signature Certificate with USB Token or Document Signer certificate.
2) A computer or laptop with the latest version of Windows.
3) PDF Reader should be downloaded in system. (Suggested Adobe & Foxit)
What Is Class 3 Digital Signature Certificate?
A Class 3 Digital Signature Certificate is a digital certificate issued by a licensed certifying authority. It is highly secure and comes with an encrypted USB token, ensuring that no one can misuse it without the USB token password. We can help you purchase a Class 3 Digital Signature Certificate if you don't already have one.
Complete Procedure for Digitally Sign PDFs With DSC Using Signsecure Digital Signature Application:-
Overview of all functions :-
A) Signing Modes :-
a) Template mode :- It is most used function of our Digital Signature App. In Template Mode, you can create a template to fix the signature's position on the document. You can sign with multiple DSCs/PFX files using Template Mode.
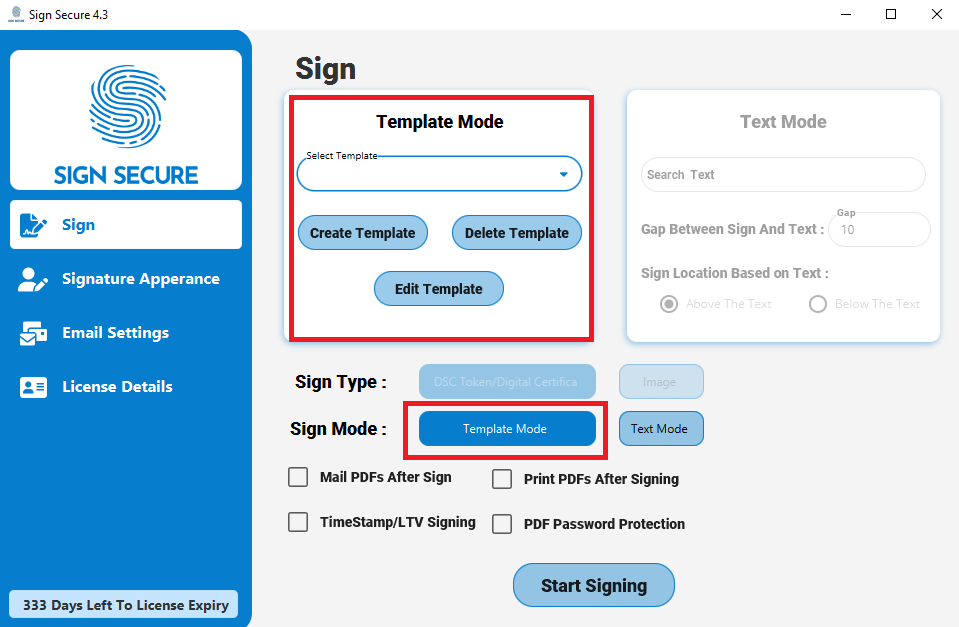
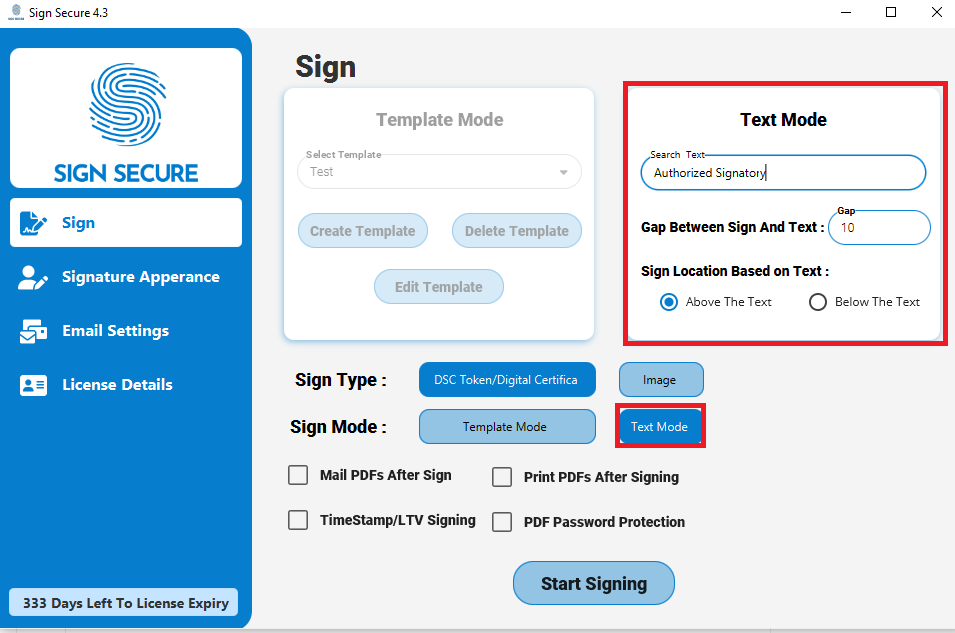
b) Text Mode :- In Text Mode, you can command the Digital Signature Tool to Digitally Sign PDF file above or below any unique word in the document.
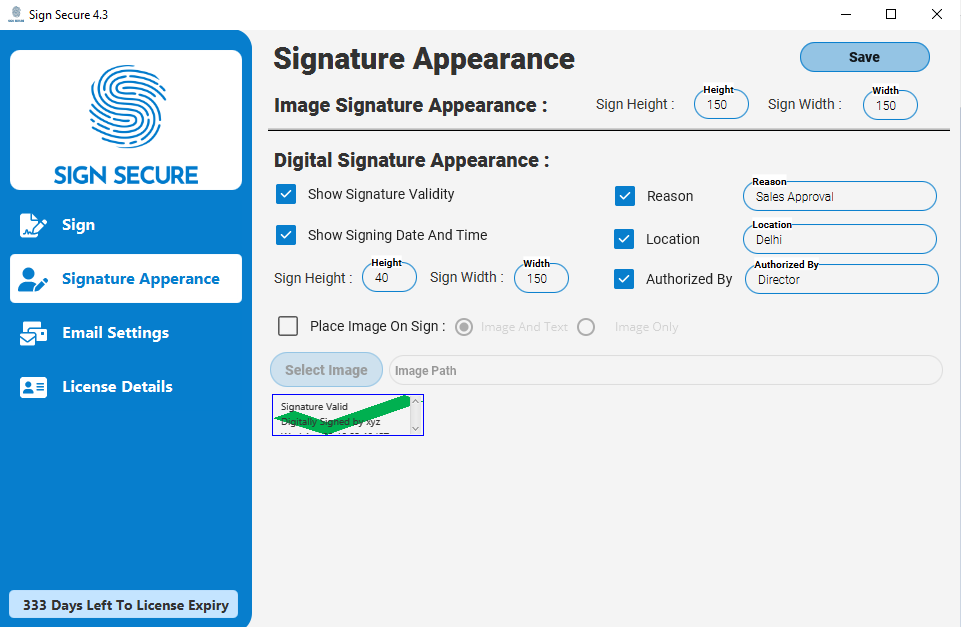
B) Signature Appearance :-
You can define the signature appearance on the PDF with this option. (You can add images of the company stamp, logo, manual signatures, etc. Additionally, you can add extra text, such as the signing location, reason, authorized signatory's designation, etc.)
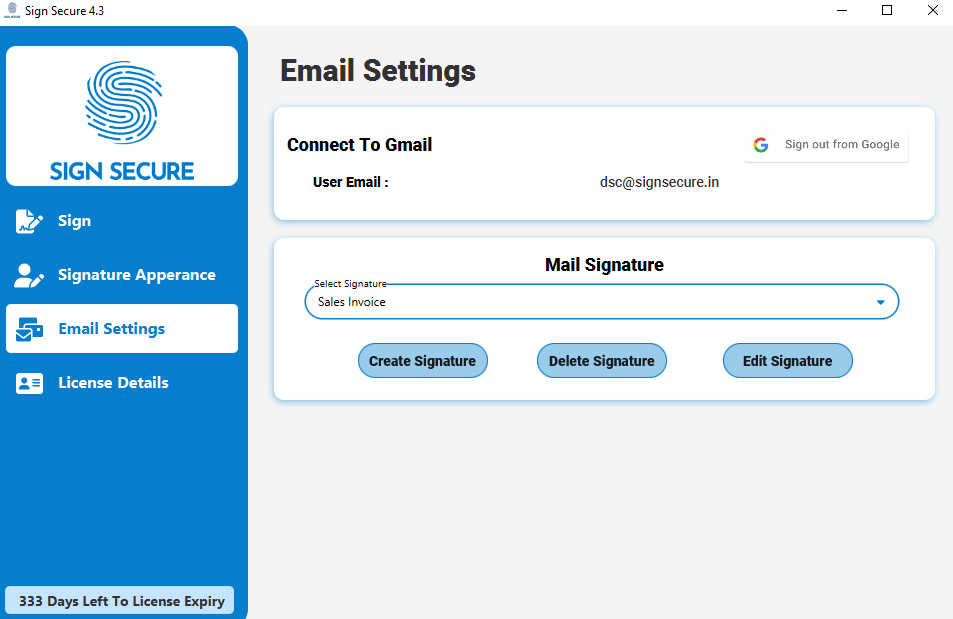
C) Email Settings :-
If you want to email the signed documents after signing, you can use this option. We have integrated Gmail with our Digital Signature App. You can log in to your Gmail account through the application to allow it to send emails on behalf of your Gmail account.
Signing With Template mode :-
A) Digital Signature Software Download :-
Visit our website “signsecure.in” for Digital Signature Software Download & Purchase.
B) How to create a template :-
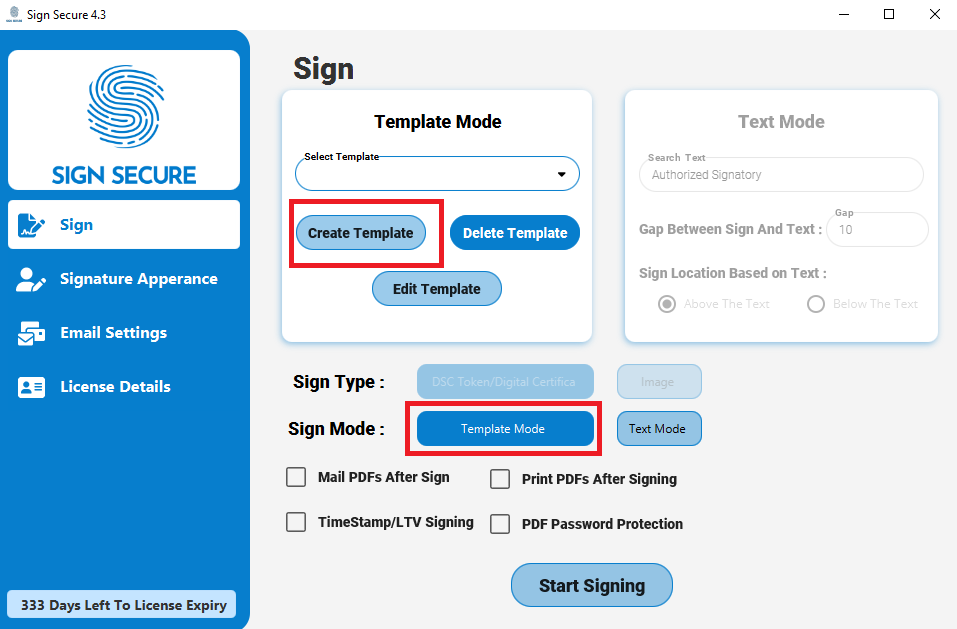
Step 1 : Click on “Template Mode” and then click the “Create Template” button.
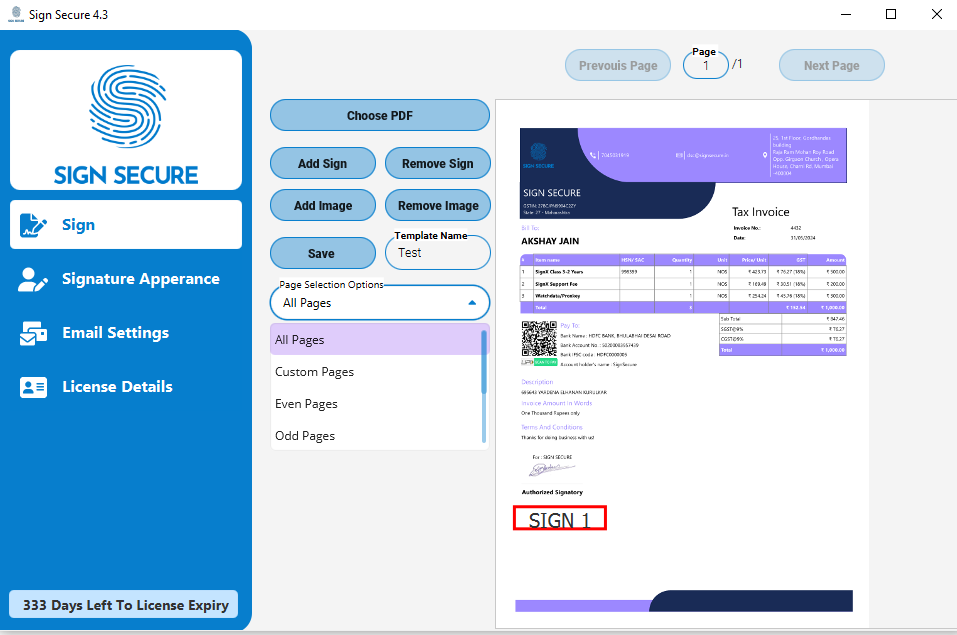
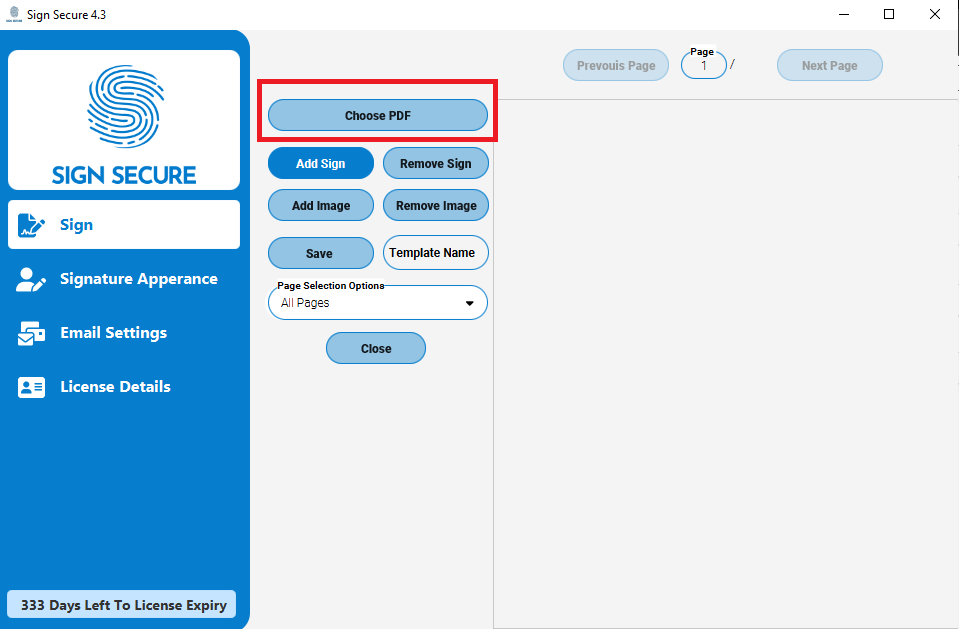
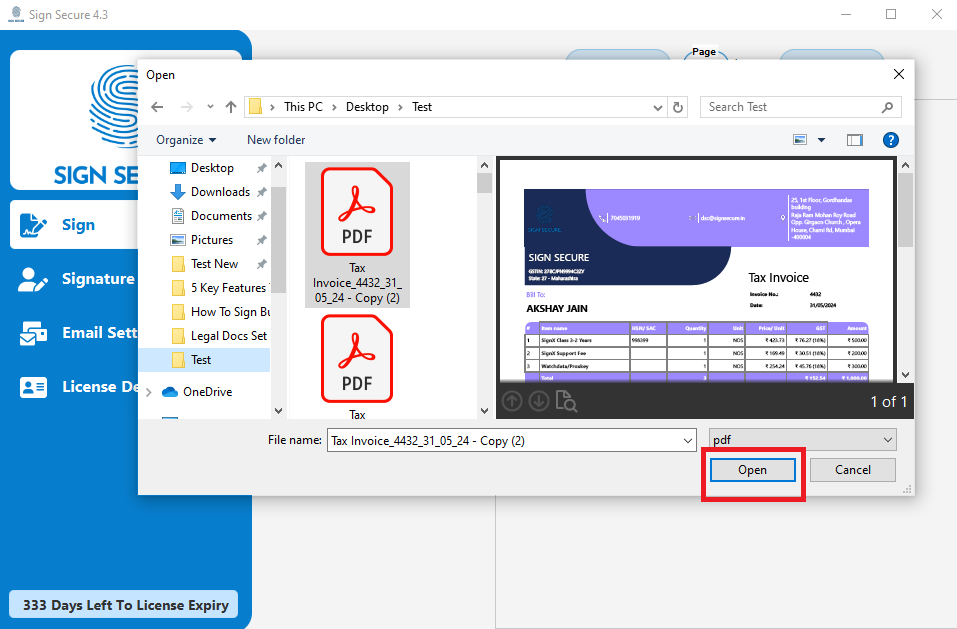
Step 2 : Click the “Choose PDF” button, then browse and open any PDF file to create the template.
For example, if you have saved 100 no of tax invoices in the same format in a folder and want to Digitally Sign them all , you can select any one PDF file from the folder to create the template.
Step 3 : Once the PDF is loaded, click on the “Add Sign” button to add the signature's appearance to the template. You can easily move the signature (Sign 1) to any part of the PDF where you want the signature to appear.
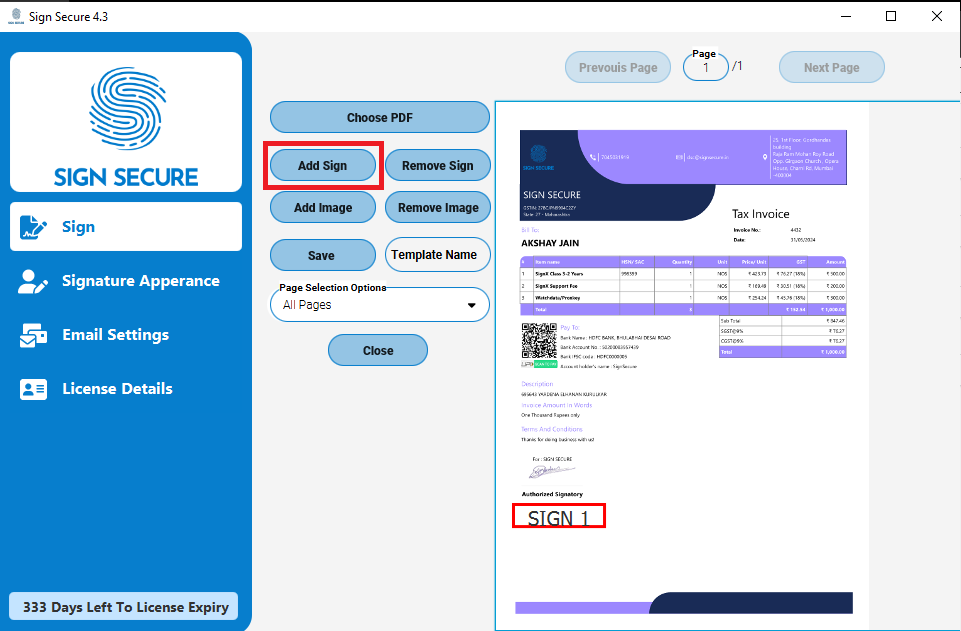
· You can also add an image (e.g., company stamp or manual signature) by clicking on the “Add Image” button.
· You can add multiple signatures of multiple authorized signatories by clicking the “Add Sign” button (e.g., SIGN 1, SIGN 2, SIGN 3, etc.).
· You can remove unwanted signs or images by clicking the “Remove Sign” and “Remove Image” buttons.
· If you have multiple pages in a PDF and want to sign all pages in the same position, tick the “Sign on All Pages” option.
· If your PDF has multiple pages and you want to sign them at different positions, you can navigate through pages using the “Previous Page” or “Next Page” buttons, or you can enter the page number where you want to add the signature.
Step 4 : Once all settings are done, name the template and click the “Save” button to save the template.
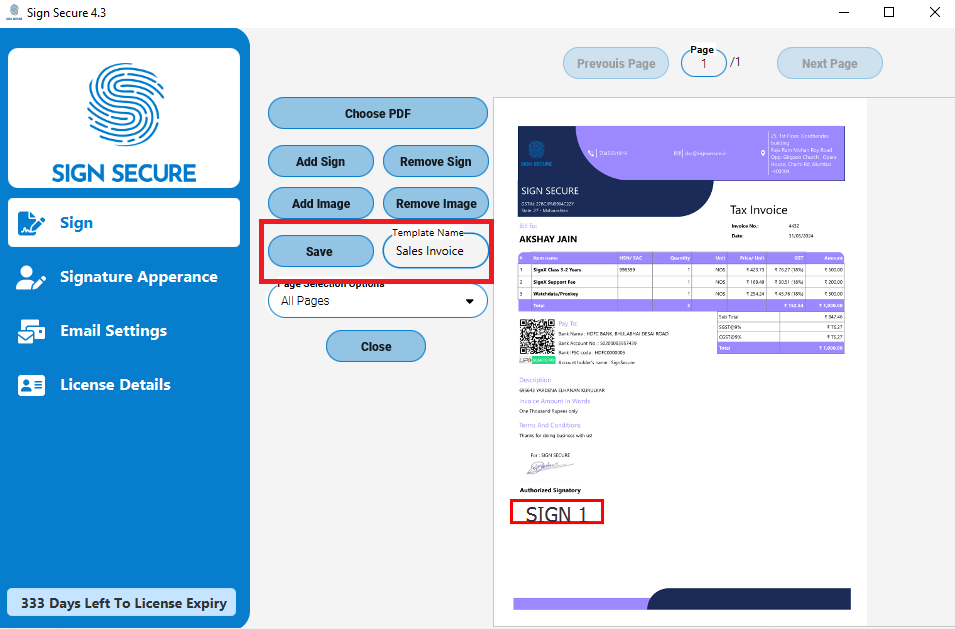
Step 5 : Now template is created & you can edit or delete any Template just by clicking on “Edit template” or “Delete template” button.
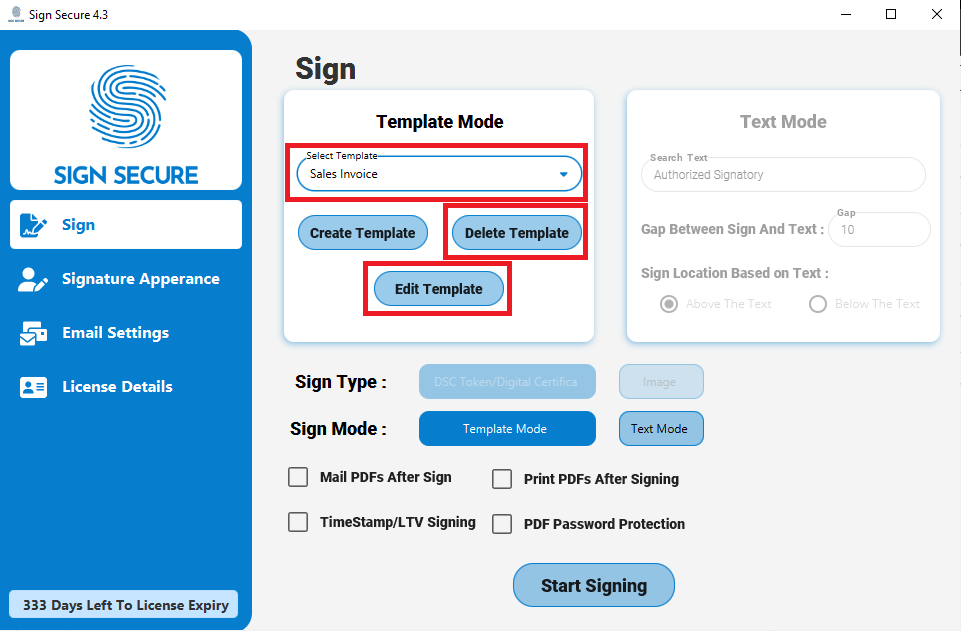
C) How to Sign with Template Mode :-
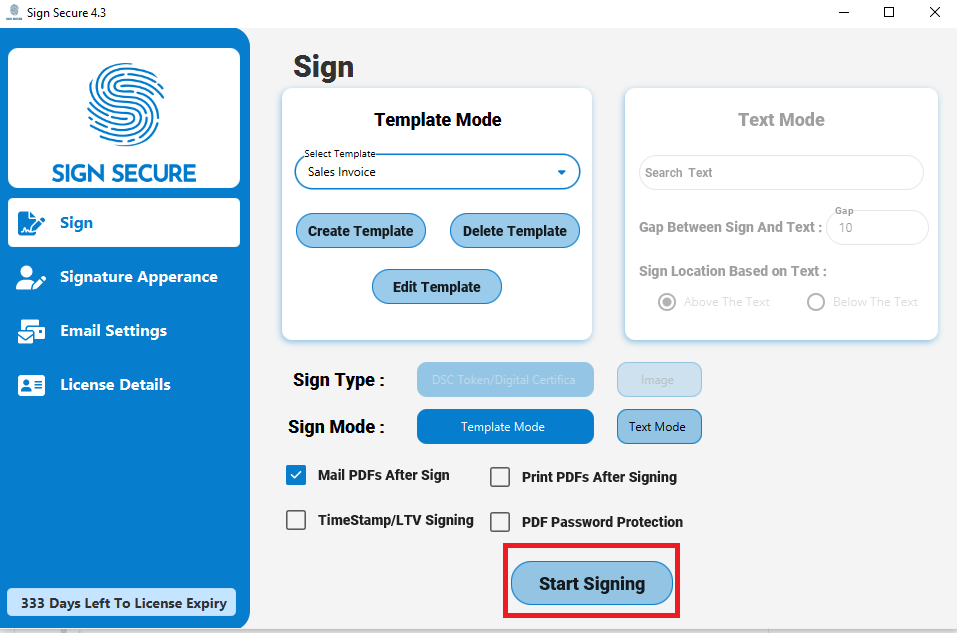
Step 1 : Click on “Template Mode,” then select the template. If you want to email the Digitally signed PDF after signing, tick the “Mail PDFs After Signing” option.
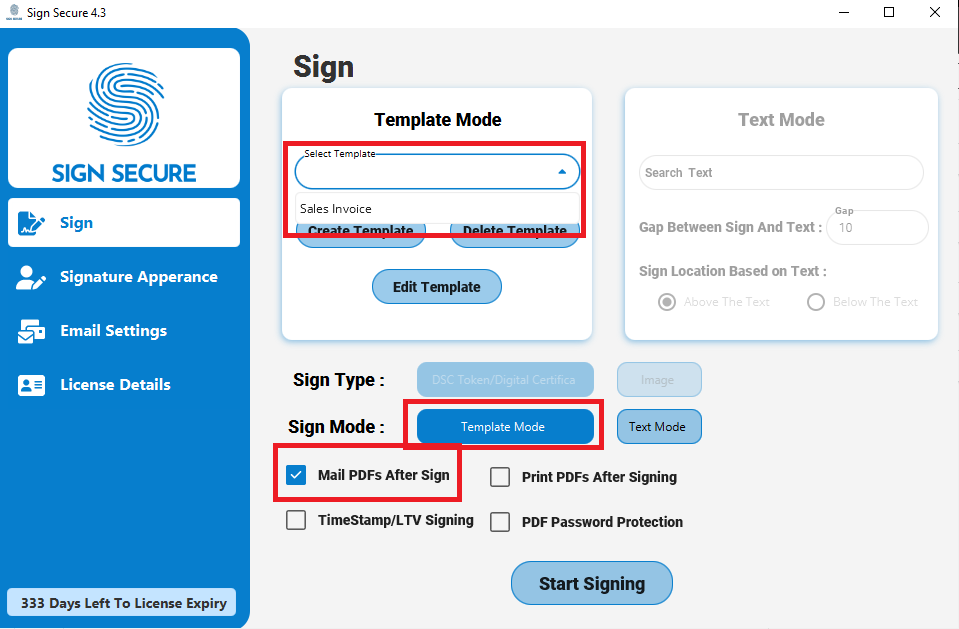
Step 2 : Click on “Start Signing” button
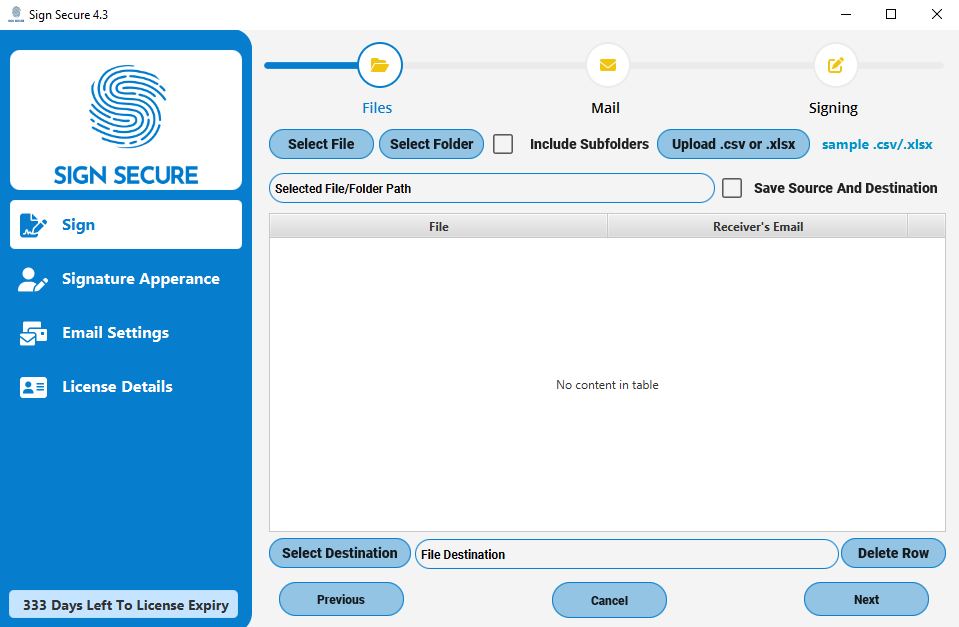
Step 3:
· You can select a Single PDF or a folder with multiple PDF to sign by clicking on “Select File” Or “Select Folder” button.
· If you want sign PDF saved in sub folder also, the just tick on “Include Subfolder”
· If you want save signed PDF on different location/in different folder then click on “Select Destination” button and select the folder.
· If you don’t choose Destination Folder our application will create a new folder in the name of “Signed PDF” in the same folder from which we are picking the PDF’s to get signed.
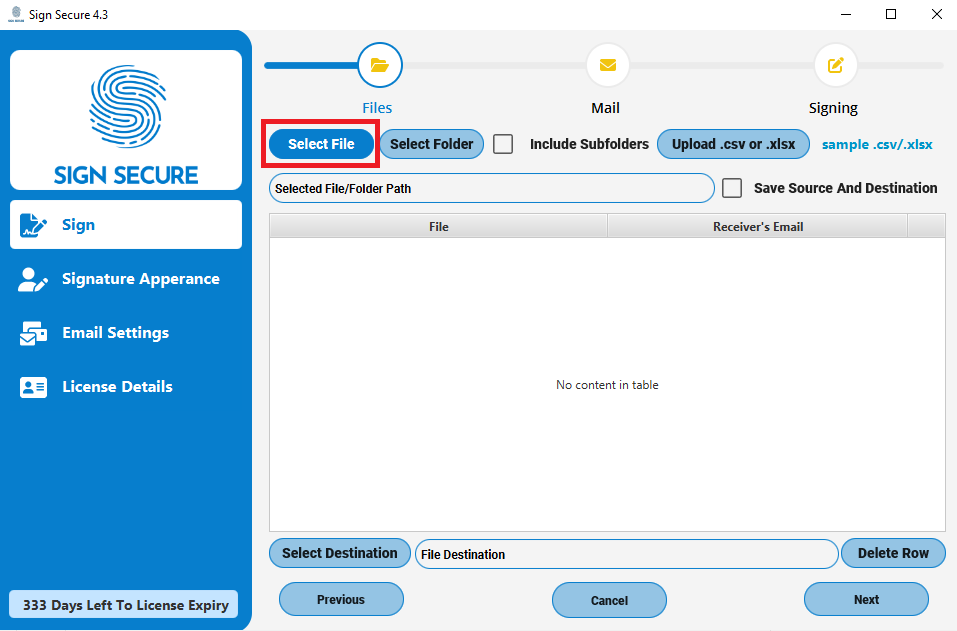
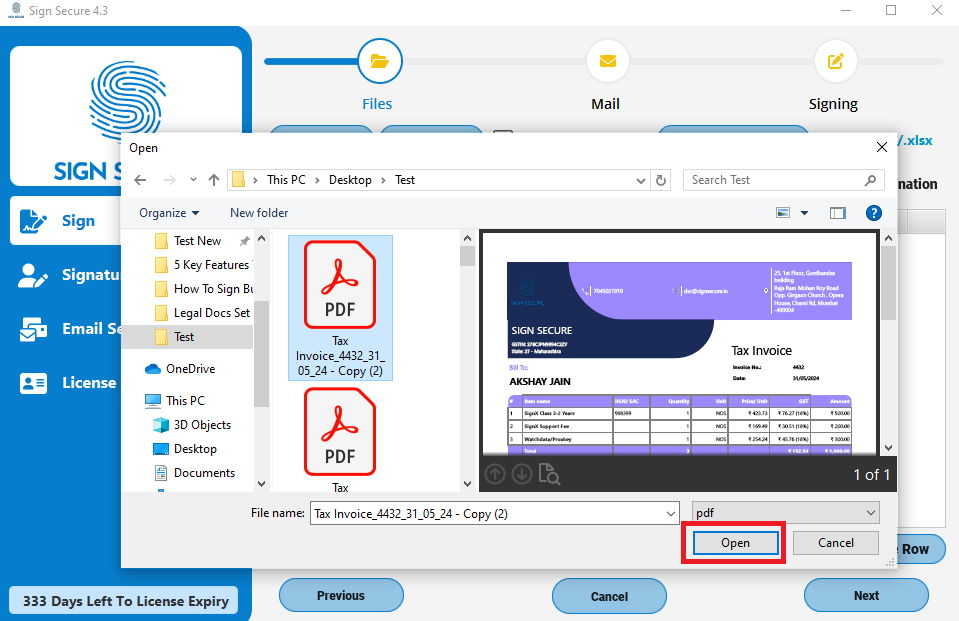
Step 4 : Click on “Select File” button and choose the PDF in which you have saved PDF’s to be signed
Step 5 : All PDF names will appear. Now just add receivers email ID and press “Enter” button
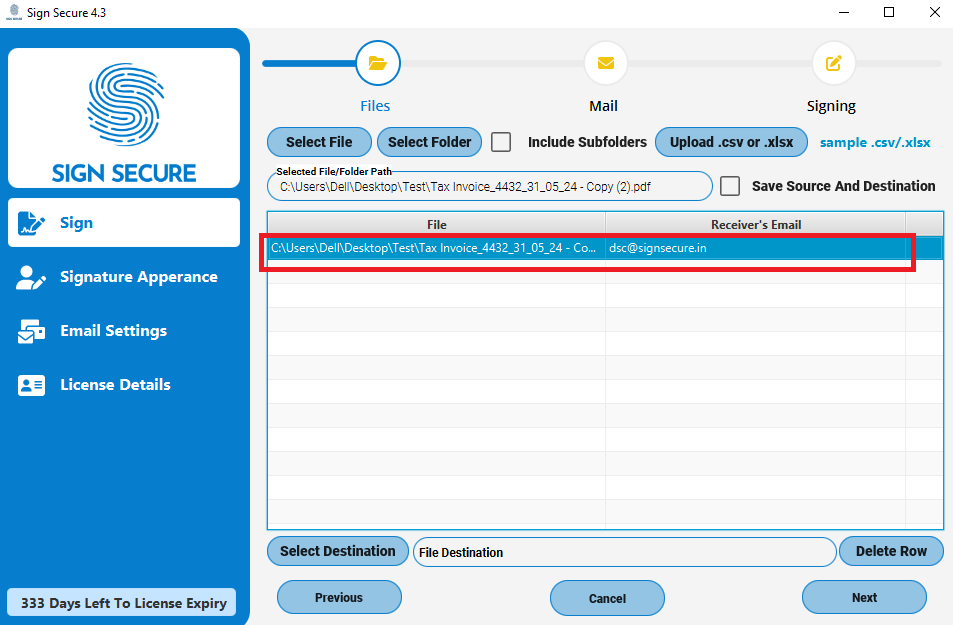
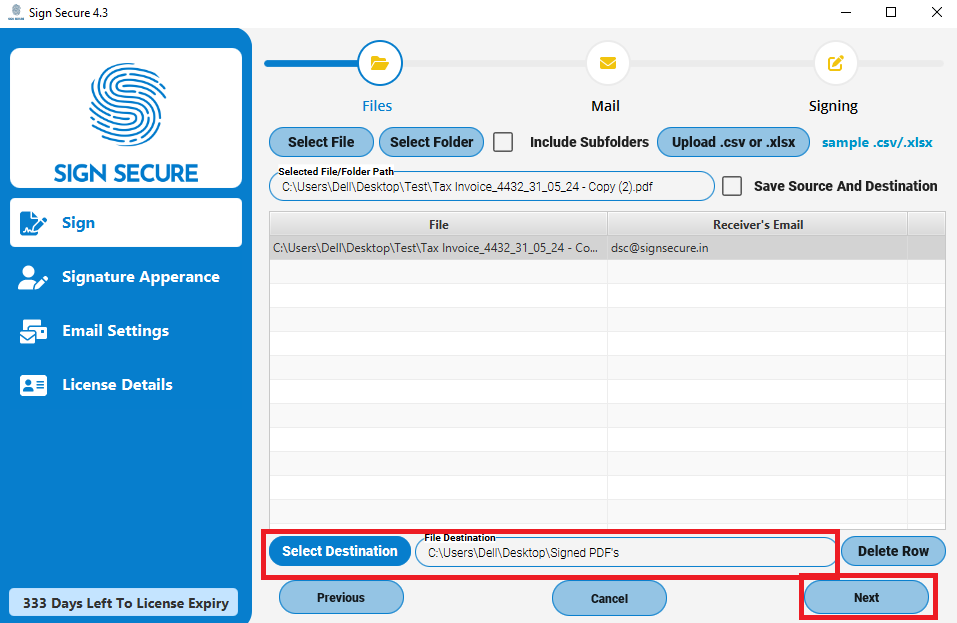
Step 6 : Click on “Select Destination” button if you want to save Digitally Signed PDF in any other location. Then clcik on “Next” button.
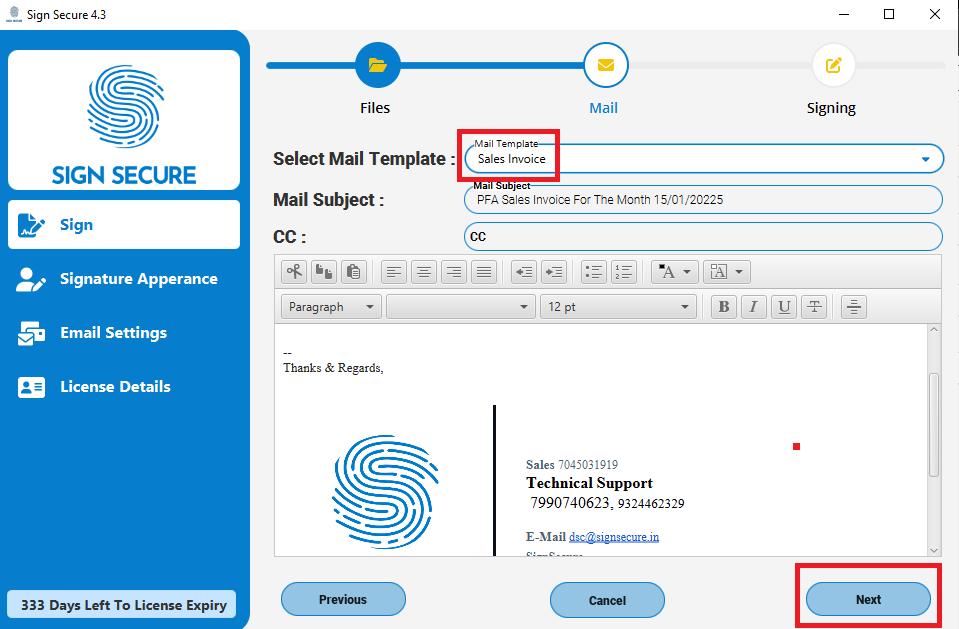
Step 7 : Now you can choose Email Template or you can draft email manually as you want. Once mail drafting is completed click on “Next” button.
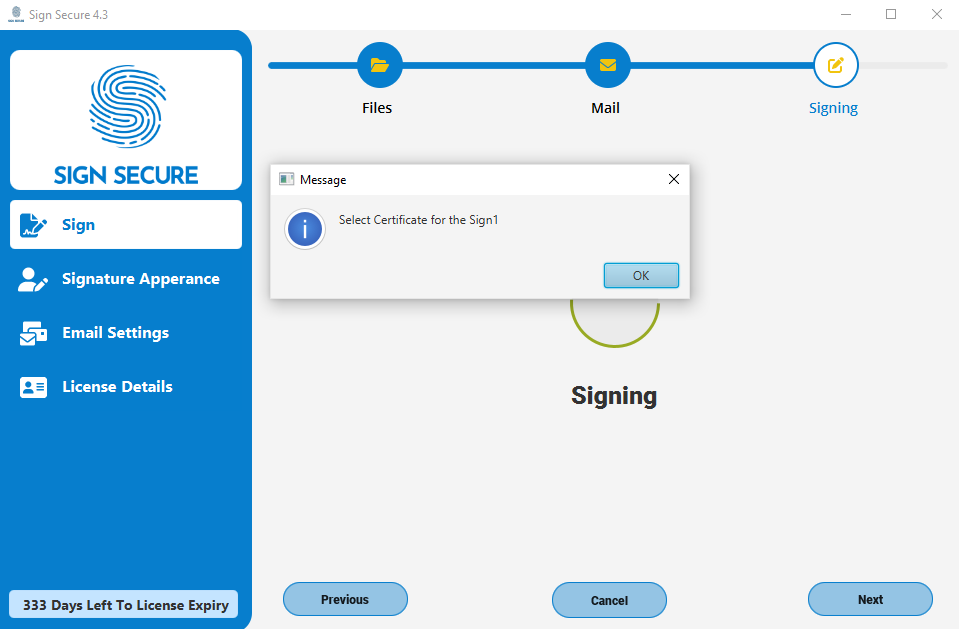
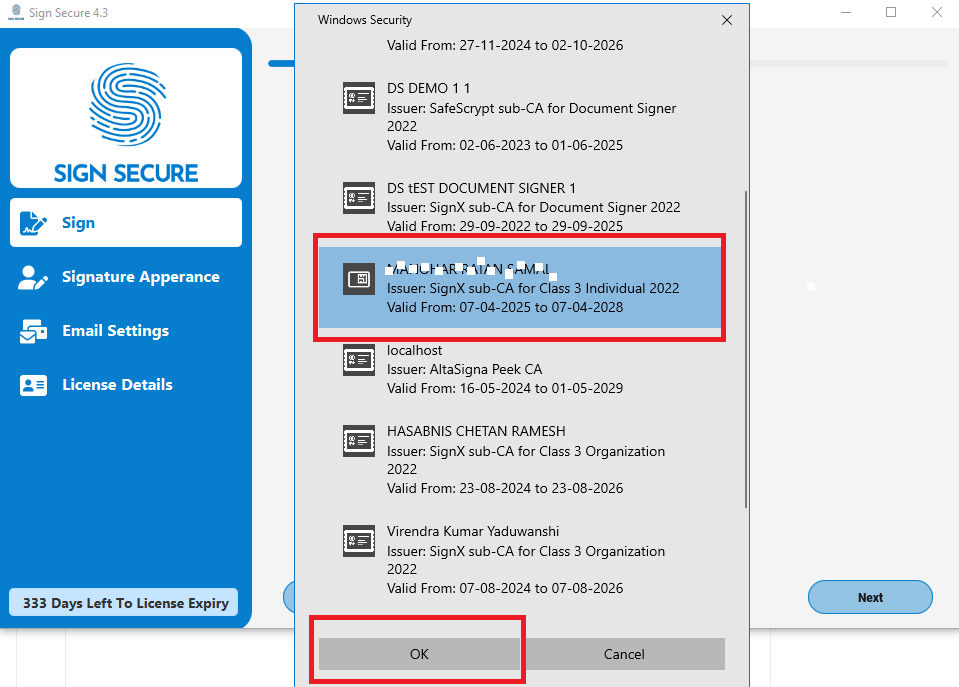
Step 8 : Now Digital Signature Tool will ask to choose a signature. Select the Signature and click on “Ok” button.
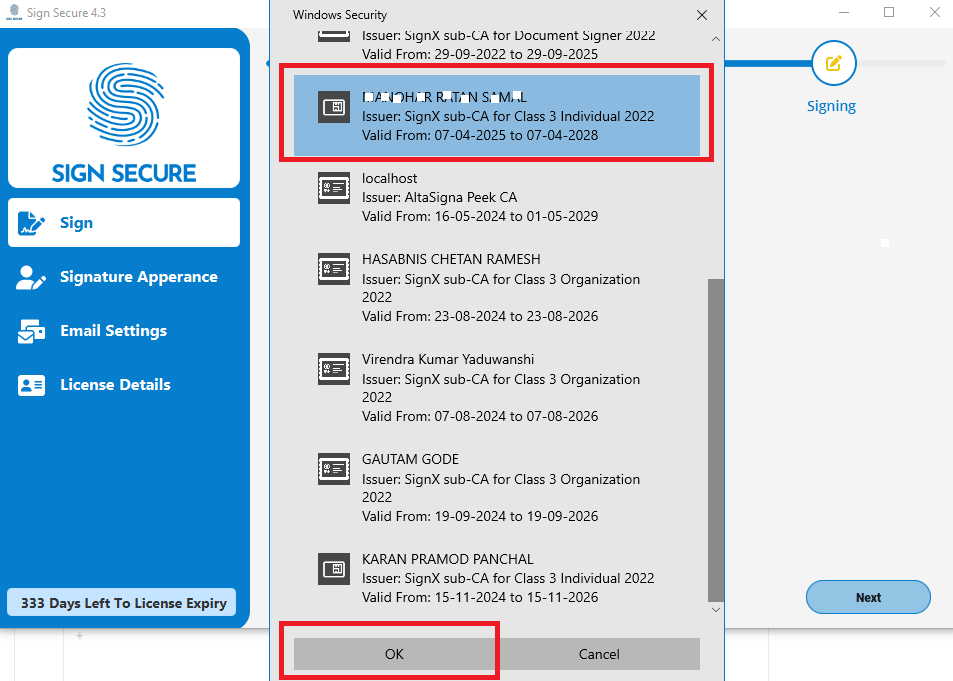
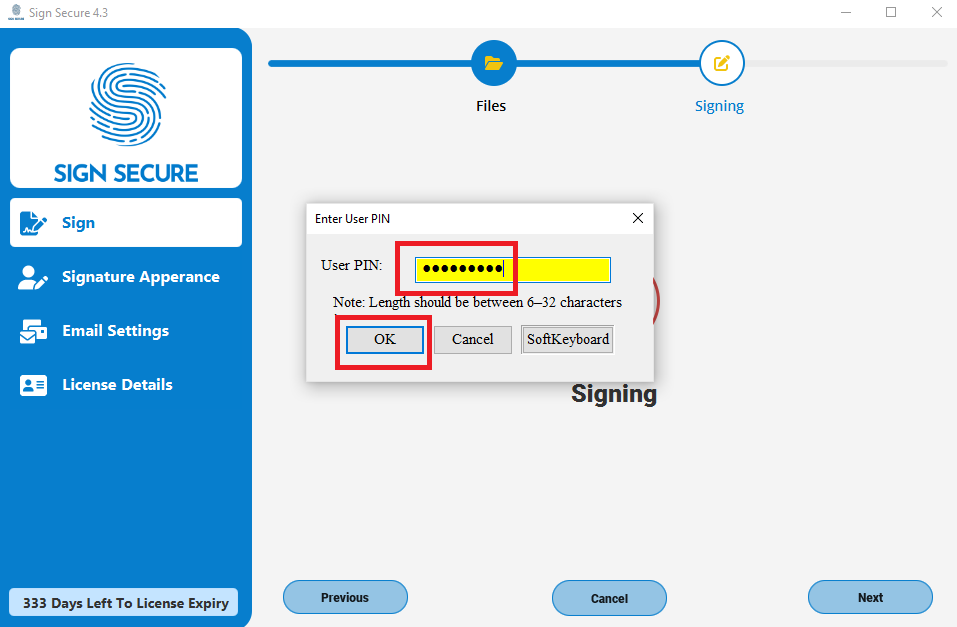
Step 9 : Enter USB token Password & click on “ok” button
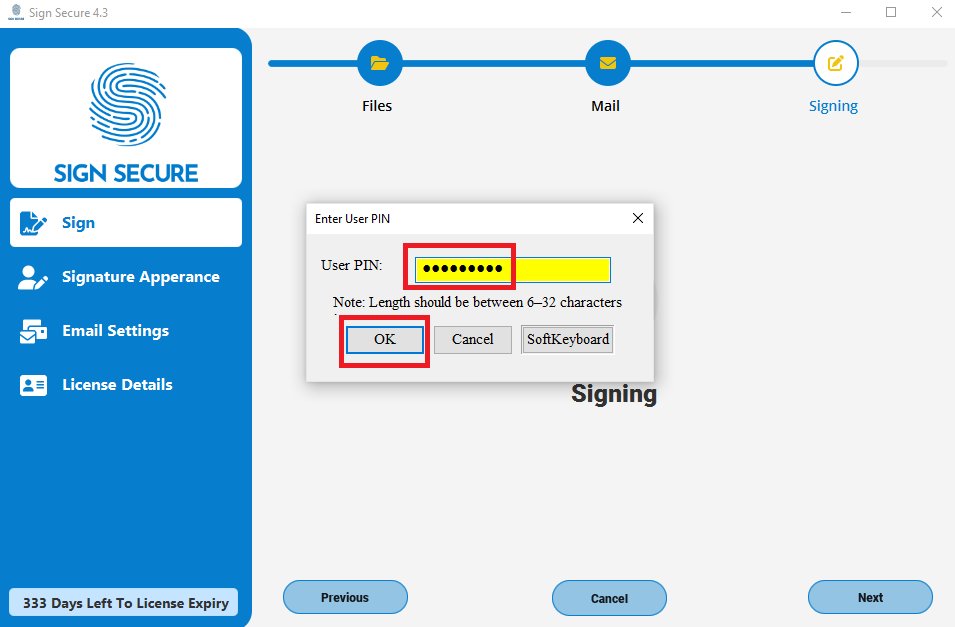
Step 10 : Now document will get signed. Then same document will be mailed on receiver’s email ID’s.
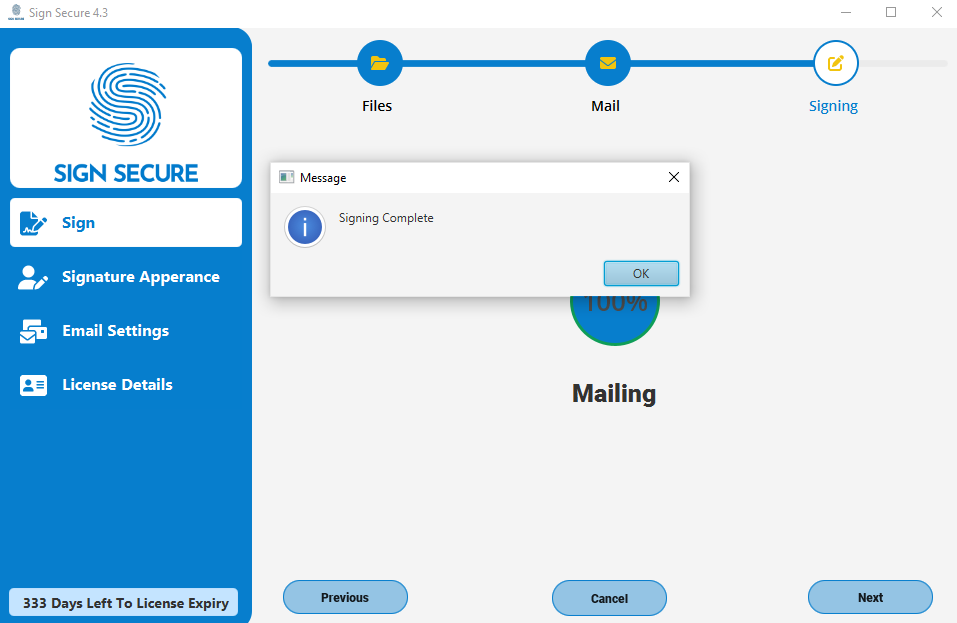
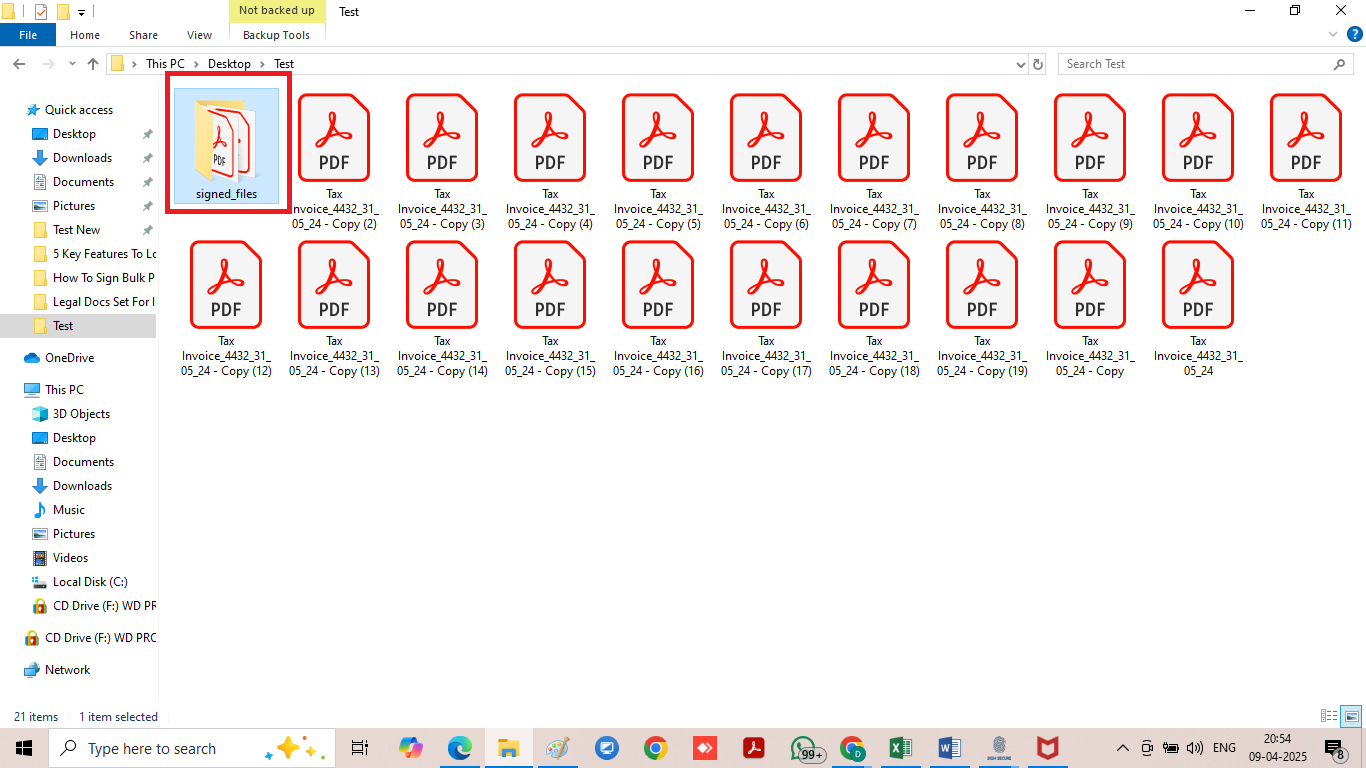
Step 11 : Now you can see our software has saved signed PDF in the folder selected in "Destination Folder" option. Open that folder.

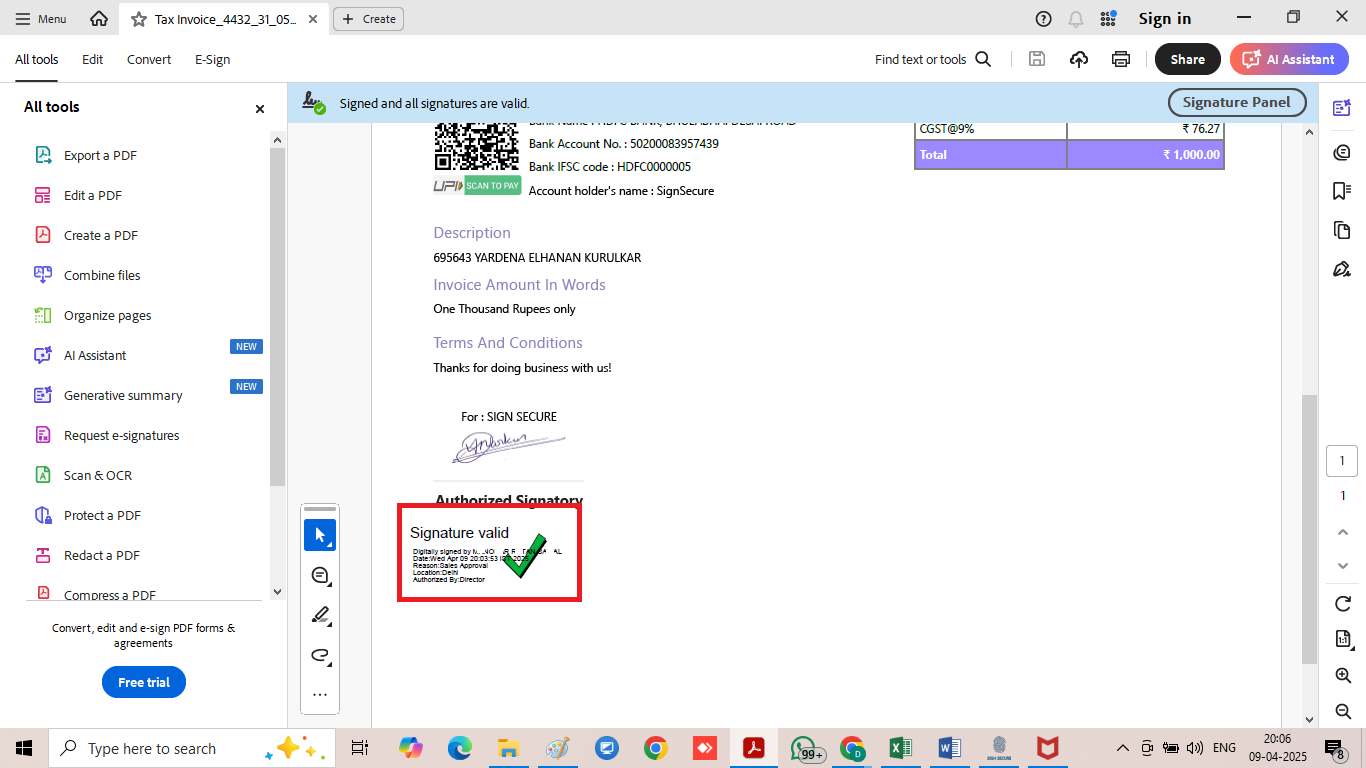
Step 12: Now open any PDF. Now you can see your PDF is signed and signature is appearing on the same position as you have set in Template.
Signing With Text mode :-
Step 1: Now you can see we have a unique Text (Authorized Signatory) in our invoice & we want to sign above/below the same text. Hence we have copied this text and we are going to paste it in our Digital Signature app.
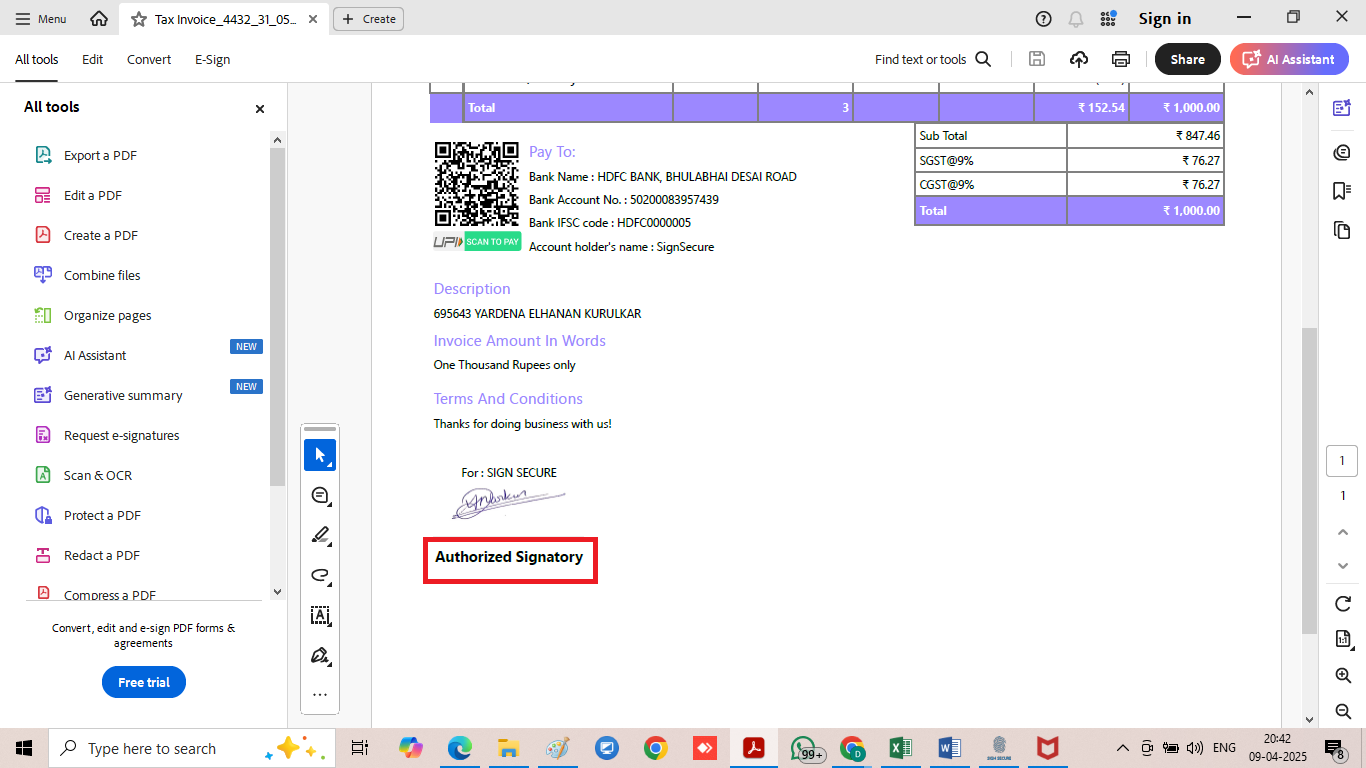
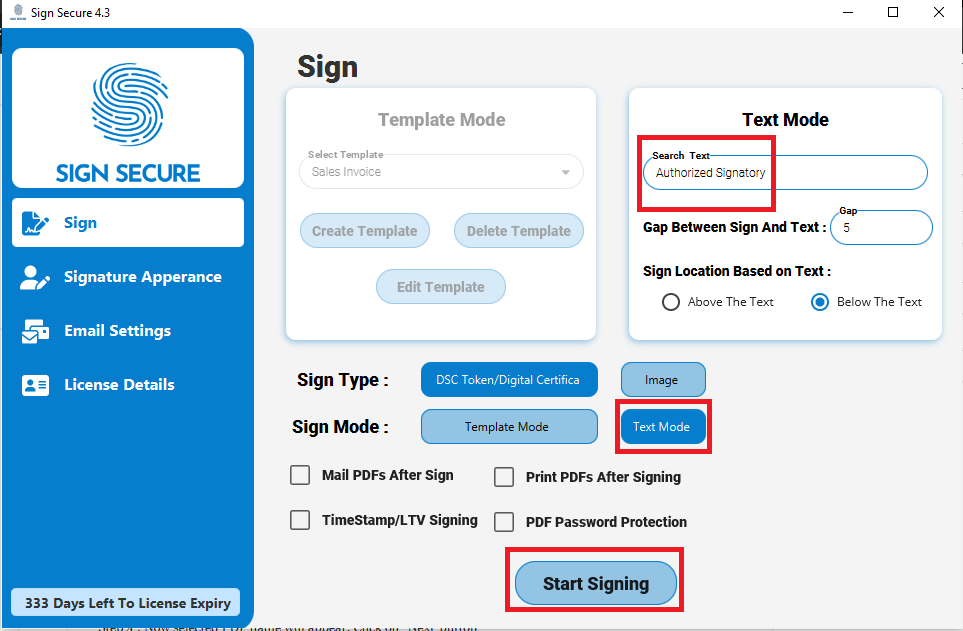
Step 2: Open the Digital Signature App. Click on “Text Mode” & paste copied text in “Search text” option. Set the gap between Searched Text and Signature appearance. Click on the button “Above The Text” or “Below The Text” as per your requirement & click on “Start Signing” button.
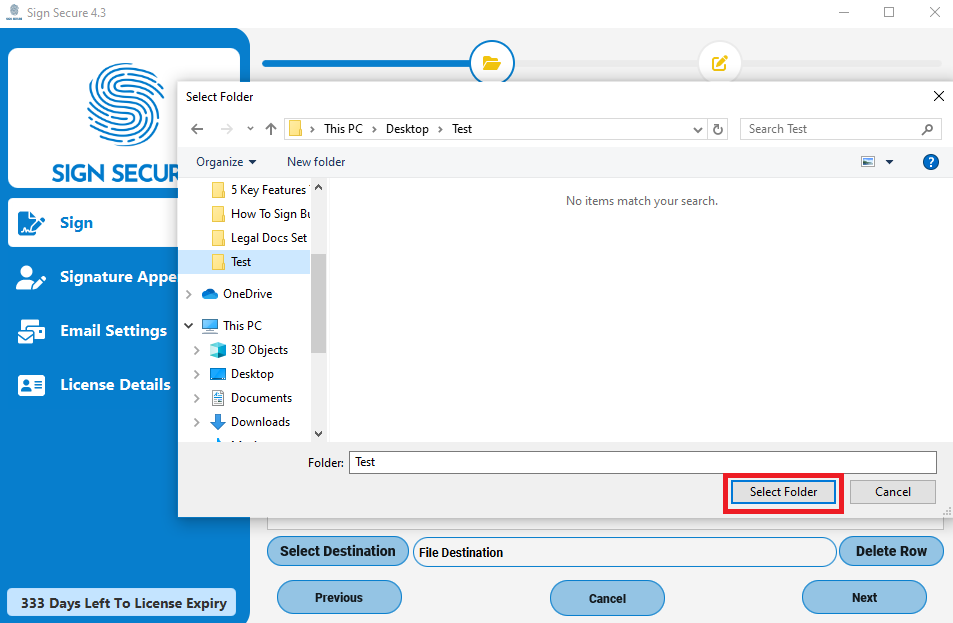
Step 3 : Now click on “Select Folder” button. Choose the PDF files which you want to sign digitally & click on “Open” button.
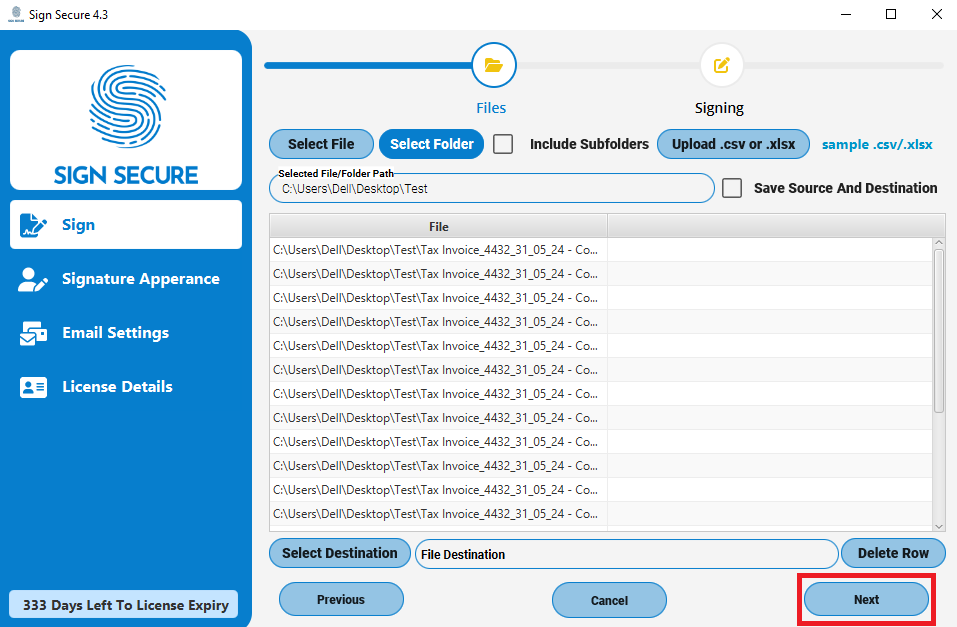
Step 4 : Now selected PDF name will appear. Click on “Next” button.
Step 5 : Select the Digital Signature with which you want to sign & click on “OK” button.
Step 6 : Enter USB Token password & click on “OK” button.
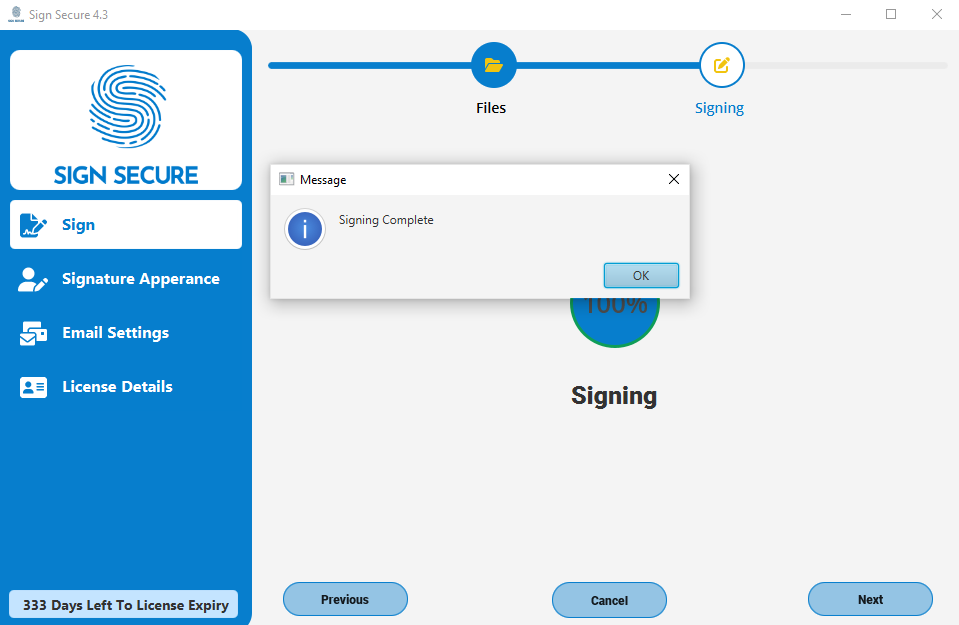
Step 7: This message will appear once document will be signed
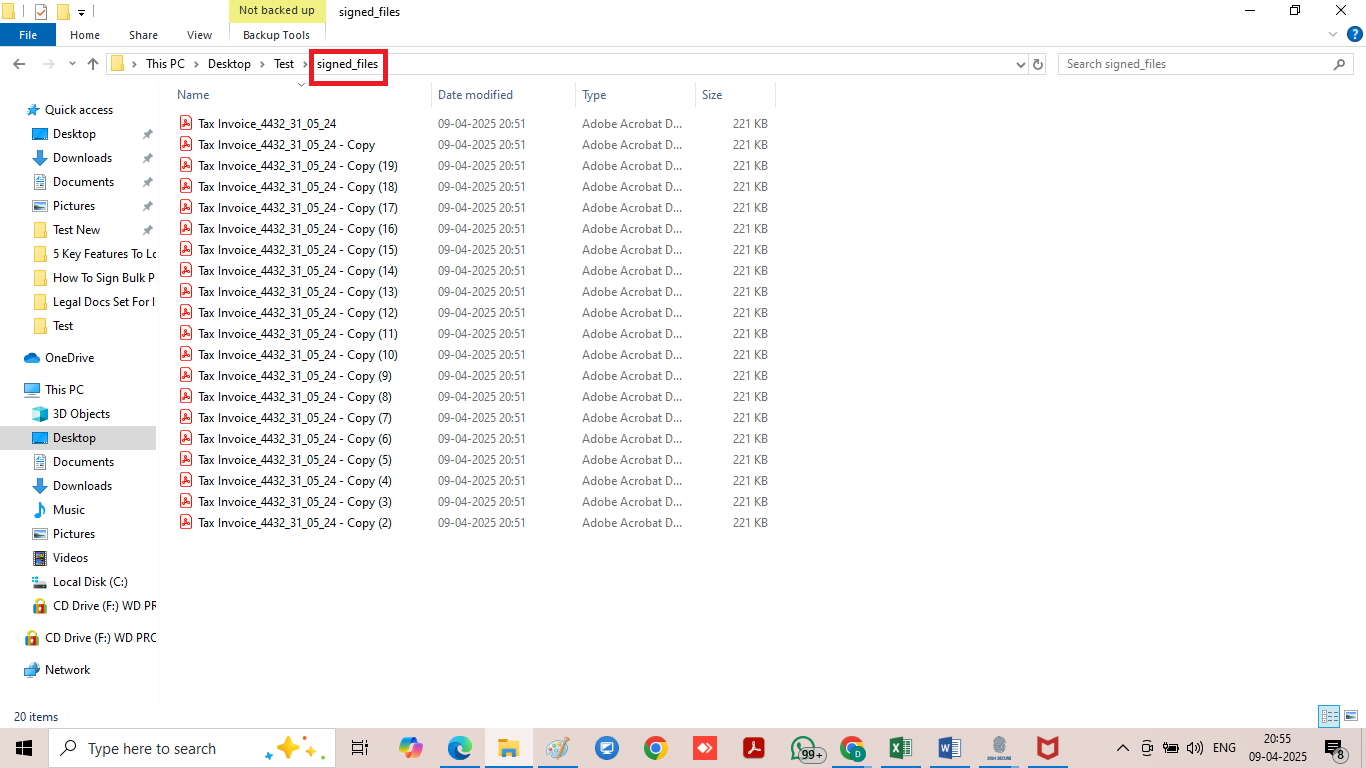
Step 8: Now you can check our application has created a sub folder in our original folder in the name of "signed_files" and all digitally signed PDF's will be stored in the same sub folder.
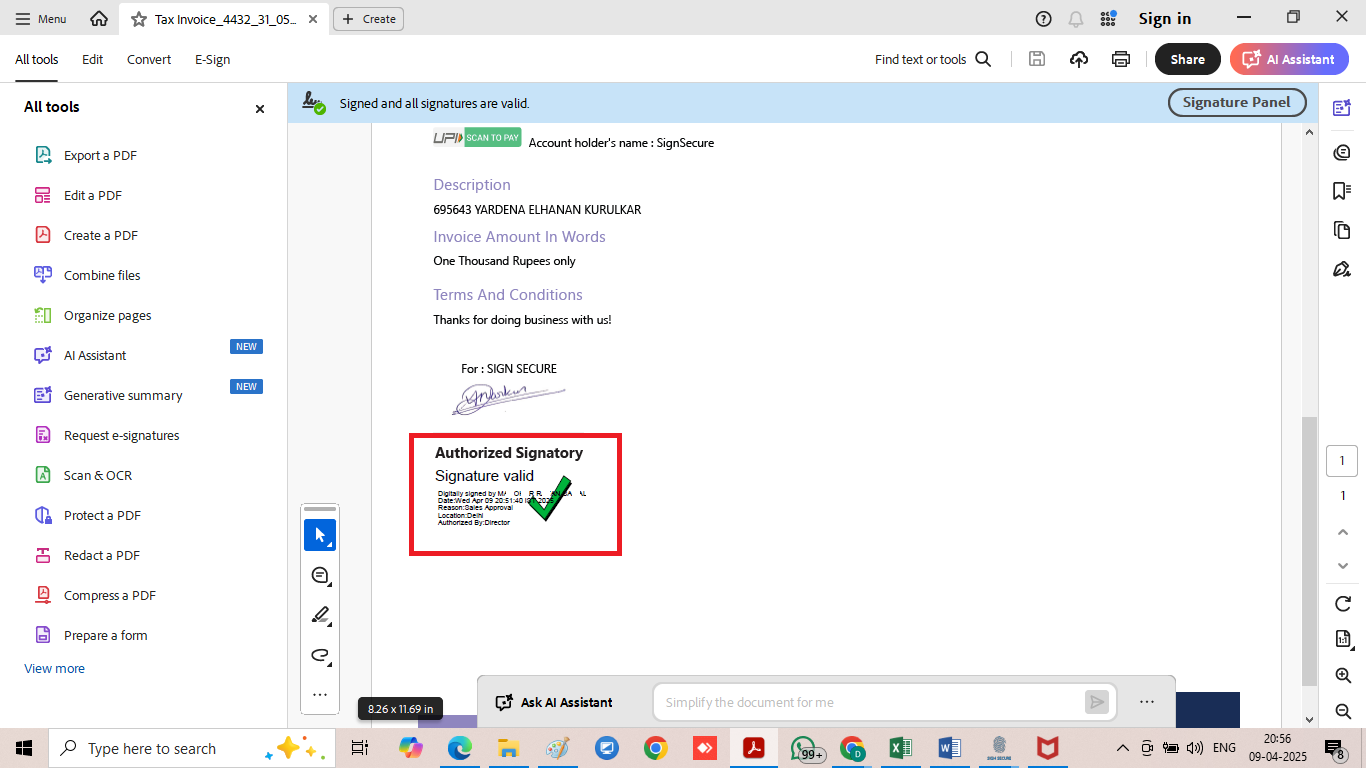
Step 9: Open the subfolder “signed_pdf” and open a PDF saved in it. And now you can see documents have got signed digitally below the text “ Authorized Signatory” as we commanded.
Frequently Asked Questions :-
1. How many documents we can sign with Signsecure PDF DSC Signer ?
You can sign unlimited number of PDF Documents digitally with our PDF DSC Signer.
2. Is there any free version of Signsecure PDF DSC Signer ?
Yes, you can we have a free version of PDF DSC Signer. We have given option on our website signsecure.in for PDF DSC Signer Software Free Download. Only difference between free & paid version of PDF DSC Signer is that if you use free version, our company name watermark will print on each Digitally Signed PDF.
3. Can we use image of our manual signature to sign PDF ?
Yes, you can use image of your manual signature to sign PDF. That option is available in our PDF DSC Signer